Showing posts with label Kitchen Tips. Show all posts

Monday, March 24, 2014

Giving a Meal

When I first signed up to bring a meal to a family in need, I really didn't know what I was doing.  All I knew was that I wanted to help!  After the Peanut was born, though, several people brought meals to me, which really helped me see the best ways to do it.  I thought I'd share some suggestions here, in case you're wanting to help out a friend by bringing them a meal!

Meals are a great gift for people who are going through a difficult time (death of a family member, someone in the hospital, etc.) or who are facing a major life change (having a baby, for example).  It's a wonderful way to bless someone!  And it's such a blessing to give someone a meal.

Here are my suggestions when bringing someone a meal {and then I'll give you an example of a meal I gave - - you can copy mine or make your own!}:

Know about any allergies or dietary restrictions
It would be terrible to make a meatloaf for a vegetarian, or tuna noodle casserole for someone who doesn't like fish!  Find out if there are any allergies or other dietary restriction in the family before you plan your meal.  It will save everyone a lot of grief.

Be on time
...and coordinate a time!  Find out when the family usually eats dinner, and have the meal to them on time.  If it's something they'll have to pop in the oven (which I recommend), make sure they have enough time to preheat the oven and bake your meal before their normal meal time.  If you are running late, call and let them know when you'll be there so they don't have the little ones strapped into their high chairs for 30 minutes promising them food that is coming (yes, this has happened to me!).  If you are notoriously a late person, you could always deliver a meal early to go into the fridge or freezer for that evening or another day!

Include all of the food groups
Grain, Meat, Veggie, Fruit, and of course a dessert!

Double what you're making for your family
This is the best way I've found to give someone a meal.  Make double of what you're making for your family, and bring it over before dinner time (or the next day, if it'll keep).  It's so much easier than making an extra meal on top of what you are eating!


The meal I most recently gifted was ziti, salad, bread, and brownies for a family of 4 plus an infant.  I made a large ziti for their family (9X13), which I actually ended up thinking might have been a little too much food for them, and a smaller one for us (8X8).  I have shared the recipes for the ziti and the brownies before.  A bagged salad and a pre-sliced loaf of bread made this meal complete!

I was also sure to label everything that I made - - and I wrote instructions on the ziti of how to bake.


Then I bagged everything up (the ziti didn't fit) and headed over!  Notice everything was in containers that nobody would expect to have to return.  Not even cheap tupperware - - it gives a new mother or someone going through a tough time an extra step: dishes.  Ideally, if they wanted to, they could bake this, use paper or plastic dishes and silverware and not have any clean-up afterwards!
 

There you have it!  Happy giving!

Monday, March 17, 2014

York Peppermint Patties Brownies

Oh.  My.  Goodness!  So easy!  So yummy!

Ingredients:
- York Peppermint Patties
- Brownie Mix
- Whatever the Brownie Mix calls for

Step One:
Mix up the brownie mix according to package instructions.

Step Two:
Pour half of the batter into greased pan.

Step Three:
Place York Peppermint Patties on batter in pan.

Step Four:
Pour the rest of the batter on top of patties.  It won't spread as naturally as the first layer because you don't want to move the peppermint patties around as you spread the batter.  Bake according to package directions, and enjoy!

Friday, March 14, 2014

Ziti Recipe


Yummy, Yummy Ziti!!
 
This is where I got the original recipe, though I made some changes.

Ingredients:
1/2 box ziti or other pasta of choice
Splash of Vegetable Oil
1/2 onion, diced
1/2 pepper, chopped
2 tsp minced garlic (or 2 garlic cloves)
3/4 jar of spaghetti sauce
4 slices provolone cheese
1/4 cup plus a little more sour cream
1/4 cup plus a little more ricotta cheese
1/2 bag of mozzarella cheese (6oz bag)
A few shakes of grated parmesan cheese

Step One: Cook Pasta
Like normal.  Nothing to it :)


Step Two: Make Sauce
Put a splash of veggie oil in a saucepan and toss in that diced onion and chopped pepper.  Cook until they're soft.  You might want to put the pepper in before the onion to let it cook a little more - - your choice.  Then add the garlic and cook another minute or two.  When that's done and all mixed together, pour in the sauce and let it heat up.


Step Three: Layers
In a greased 8X8 pan...
1st Layer: Pasta
2nd Layer: Provolone Cheese
3rd Layer: Sour Cream
4th Layer: Ricotta Cheese
5th Layer: Sauce
6th Layer: Mozzarella and Parmesan Cheese

You might also want to try adding Italian Seasoning and/or bread crumbs!

Step Four: Bake!
Bake at 350 for 20-30 minutes (uncovered), until cheese is browning!  It's so yummy!


Happy Cooking!

Tuesday, March 12, 2013

Chocolate Cake with Chocolate Frosting


We celebrated my hubby's birthday last night!!  I am so excited that he's turning 25 (and even more excited that I'm not the one turning 25 yet).  I've known my love since freshman year of college when he was 17, we've been best friends since December of that same year, and we've been dating since he was almost 19.  I married him when he was 21 and to celebrate his 25th with him is an extra special gift.  He wanted chocolate cake with chocolate frosting.  Although that's not what I would have chosen, - - when it comes to cake, I'm a vanilla girl - - he gets whatever he wants today!!

Here's the recipe.  I got it from a friend who got it from her mother-in-law.  I don't know where she got it, so if it's yours, let me know and I'll credit you!  It's called Black Magic Cake, and I have to say it's delicious!!  Usually it goes with a peanut butter frosting that is to die for, but hubby wanted chocolate!

Ingredients You'll Need:
1 cup sugar
1 cup flour
3 Tablespoons cocoa
1 teaspoon baking powder
3 Tablespoons oil
1/2 teaspoon salt
1 egg
1 teaspoon vanilla
1 cup boiling water
1 teaspoon baking soda


**Preheat oven to 350°F (I always forget to do this before I start baking...)

Step One: Combine first 8 ingredients

Pour into a bowl the first 8 ingredients above (1 cup sugar through 1 teaspoon vanilla).  No need to mix them yet.

Step Two: Dissolve 1 teaspoon baking soda in 1 cup boiling water

Do just that - - I put the baking soda in the measuring cup and then add the water and stir a bit.  It should dissolve itself for the most part.

Step Three: Mix together all ingredients

Pour the water mixture over the rest of the ingredients in the bowl, then beat the mixture until smooth.  The batter will be very runny!

Step Four: Pour into greased pan and bake

Remember, the batter will be very runny.  That's how it's supposed to be, don't worry!  Grease an 8X8 pan and bake at 350°F for 25 minutes.  I had to put mine in for an extra 3 minutes.  Use a toothpick in the center and if it comes out clean, you're all set!

When it comes out, it should look like this:
 
Step Five: Let cool

Let the cake cool for at least one hour before frosting.  Put it on a wire rack so it really cools all the way through.  If you skip this step or try to rush it, the frosting will run off.

Step Six: Frost
 

Use a knife (or, if you're super-crafty, a pastry squeezy thing) and frost that baby with your favorite frosting.  I used a homemade frosting.

Step Seven: Decorate!
 
I used M&Ms to cover the cake, starting with the sides.
 
 
The top didn't come out exactly like I imagined it, but it still wowed my hubby!  I guess that's what I was going for all along :)
 
Step Eight: Hide it!
 
Tip: a great place to hide things from your hubby: in the oven!

Step Nine: Enjoy!!
I think this was the Love Bug's first taste of cake!  He finished his first (big surprise).
 

Wednesday, January 30, 2013

Packing Tips


My family is moving!!  We are so excited to be out of a one-bedroom apartment (with 3 people) and into a 3-bedroom!  Crazy thing is that we'll be paying less at our new place.  What a God thing.

I have to say that living in a one bedroom with three people has been a huge blessing to us in many ways.  For one thing, we were blessed to find a place that we could afford that was close to hubby's work.  We were also so very very blessed by our landlord.  Let me tell you, he has been so good to us!  What a wonderful thing to have a Christian landlord!!  But I think the best way that this place has been a blessing to us is that it has humbled us in ways we never thought possible.  We are more stingy with our money that we ever would have been if we had decided that we simply couldn't live in a one bedroom with a baby!  Let me tell you, with God all things are possible!!  We are also feeling less like we need things than ever before.  Rather than moving into this bigger apartment because we need to, we are more able to recognize that it is because we want the space.  It is a huge accomplishment for us to consider the difference between a want and a need.

Anyway, here are the packing tips that I have come up with while packing the odds and ends that have accumulated around the house.  Most of these are ways that I am trying to save mula in the midst of a move.  Let me know if you have any other ideas!!

Pack dishes in a plastic bin with blankets
I'm using blankets, hoodies, fabric napkins, and anything else that I will have to pack anyways instead of bubble wrap... it will serve the same purpose without us having to buy plastic that we will just throw away after the move.

The other thing about packing dishes that makes me nervous is putting them in a cardboard box.  It always makes me think that they will all fall out of the bottom of the box.  I'm using a plastic bin that I had in storage instead of a cardboard box.  It just gives me some peace of mind.

Garbage Bags are your Friend
Donate or throw away anything that you won't have a place for when you move.  I always hate having that one box of junk toward the end that really didn't fit into any other category, so you stuck all the odds and ends in it.  I decided with this move I didn't want any boxes that I was dreading going through, so I'm not putting anything in a box unless I have a place in mind for it.

Make sure you donate as much as you can, rather than throwing things away.  Try not to be wasteful, but if you don't have a place for it, you don't need it.

Masking Tape: Label your boxes with the room they're going to
When all your friends come over to pack up the U-Haul, it's going to be chaotic... no matter how much planning and packing you have already done.  If you're like me, you don't like chaos and will want to hit the pause button while you tidy around people and send them to the right place with each and every box.  Realize that you can't do that... and plan ahead.  Simple use of masking tape and a sharpie will get your boxes into the right rooms.  (Don't just write what's in the boxes, write which room they go to for your movers.)

Dust off that Crockpot
I'm packing up all our dishes so that we don't have to worry about washing dishes and pots and pans in the midst of packing.  My plan is to make a crockpot dinner each night and use paper plates, silverware, and napkins for the next 5 days before the move.

If you don't want to use paper and plastic products, pack up all but some of your dishes ahead of time and make sure everyone washes their own dishes each night.  This will take the pressure off you while your head is, well, everywhere else.

If you would like to see more of my tips for moving, click here!


Thursday, January 17, 2013

Homemade Cleaners: Recipes

Today my project is one that I have been wanting to do for a very long time. Finally I found the recipes I wanted to use and bought the things I needed. Can I just say that I love these cleaners?! They are fantastic - - and, like the author of the recipes, I can't believe how much water is in each of them!  Why have I been paying so much all these years for bottles of water??  The window cleaner

I got the recipes for these cleaners from a lovely blog to which I was directed from Pinterest called Little Miss Robinson. Here is her post about the cleaners, and I'll share my experience below.

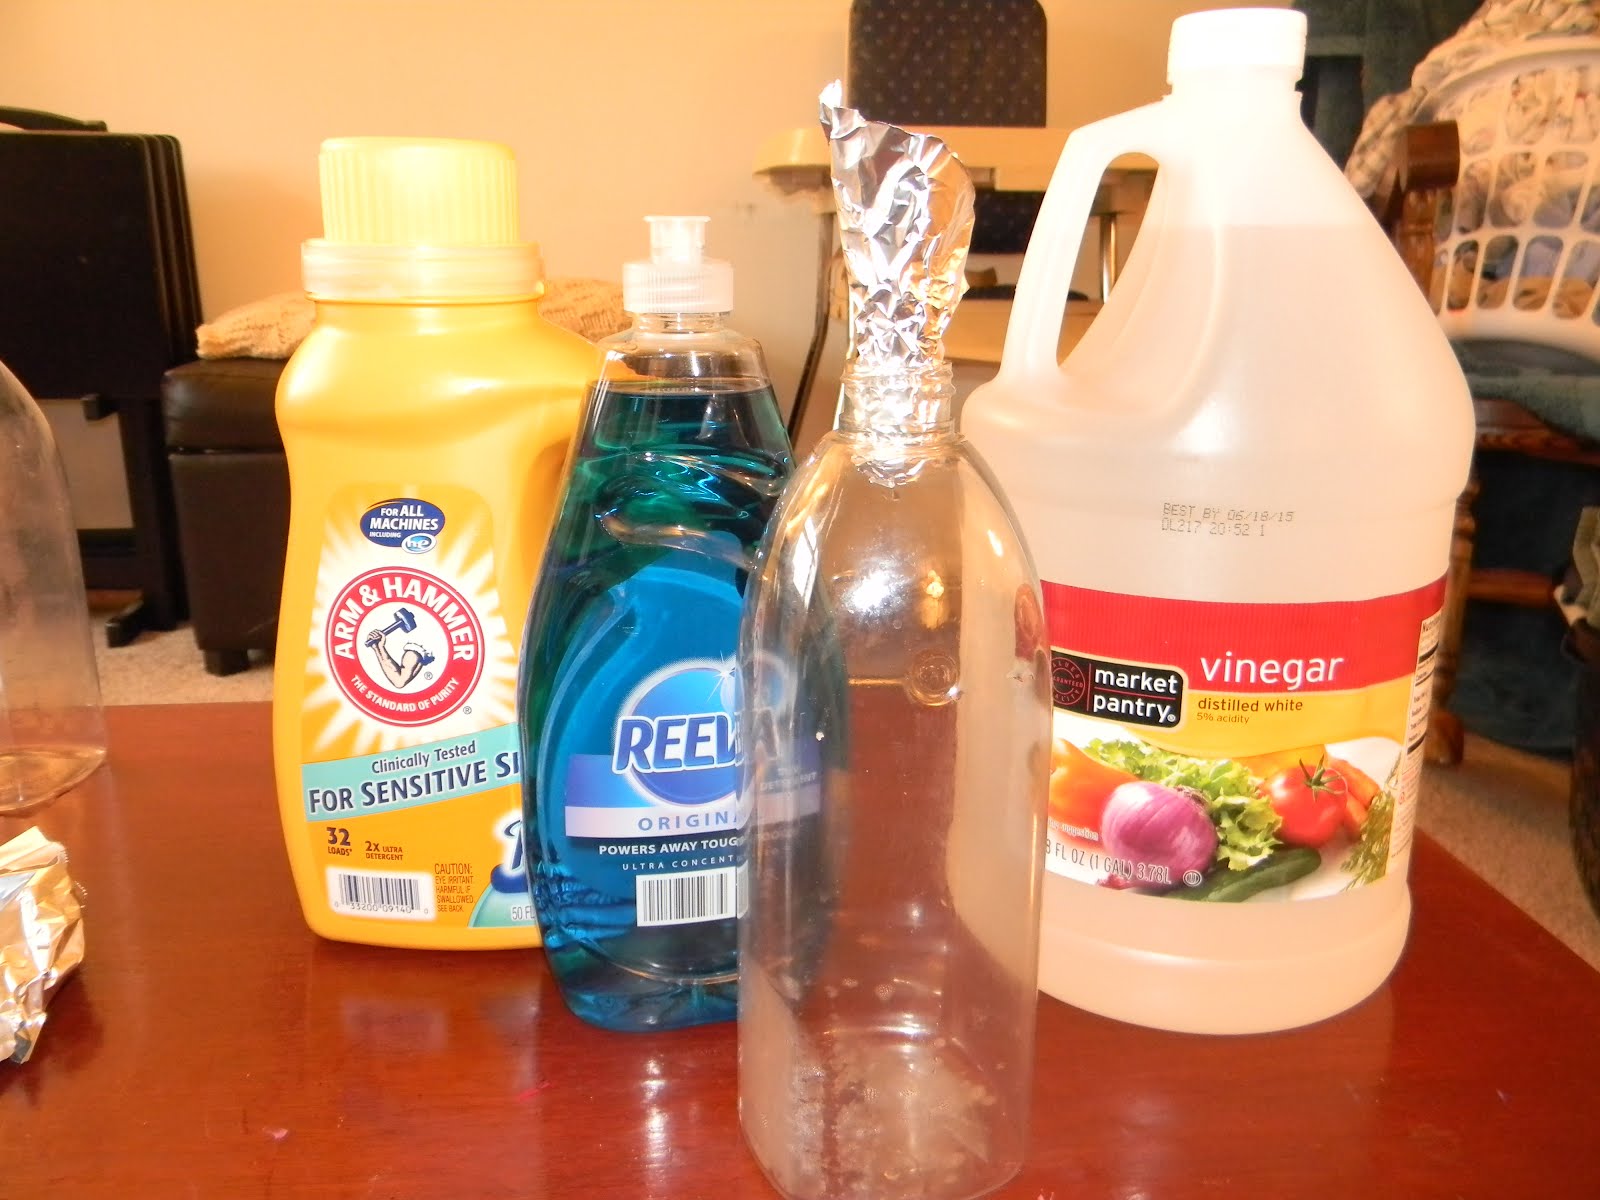
All you need to make every single one of these cleaners is the following:
  • White Vinegar (total 15oz.)
  • Dish Soap (total 12oz.)
  • Laundry Detergent (Total approximately 2Tbsp.)
  • White Ammonia (Total 1oz. plus 1 tsp.)
  • Rubbing Alcohol (Total 9oz.)
  • Fabric Softener (Total 1oz.)
  • Baking Soda (Total 2Tbsp.)
  • Bleach (Total 2oz.)
  • Essential Oil of choice (Total several drops)
  • Funnel*
  • Empty Spray Bottles (see my post here for what I did to prepare my bottles)
*I didn't have a funnel, so I used tin foil.  Just be very careful not to mix ammonia with bleach.  Make a new funnel out of foil, or wash your funnel, between each cleaner.

Cleaner #1: Kitchen Cleaner [also known as Blessing in a Bottle]
This stuff is amazing!  It cuts through grease and grime like nothing else.  I love this stuff.

Kitchen Cleaner
12oz. White Vinegar
12oz. Dish Soap
A little Laundry Detergent
 
The laundry soap in this recipe is just to cover up some of the vinegar smell.  You could probably also use some essential oils if you wanted.
 
 
Cleaner #2: Window Cleaner
This window cleaner works better than Windex.  It's wonderful!!
 
Window Cleaner
1 oz. White Ammonia
4 oz. Rubbing Alcohol
1 drop Laundry Detergent
18oz. Water
 
Cleaner #3: Air Freshner [Fabreeze]
I really like this one.  You can choose the scent of the fabric softener you use, and your whole house can smell like it!  The only thing about this cleaner is that it separates in the bottle - - so you'll want to shake it up before you use it.  The smell also doesn't seem to last long after it's sprayed... but I don't think Fabreeze actually lasts any longer anyways.
 
Air Freshner
1oz scented Fabric Softener
2 Tbsp. Baking Soda
23oz. Water
 
Cleaner #4: Bleach Cleaner
This is a must in any household.
 
Bleach Cleaner
2oz. Bleach
1 tsp. Laundry Detergent
22oz. Water
 

Cleaner #5: All-Purpose Cleaner [The "Cure-All"]
Wow.  This one is great!!  Sarah (the original poster of these recipies) says that this is the cleaner she uses most often.  It will be mine, too - - I can't believe what a great cleaner this is!!
 
All-Purpose Cleaner
5oz. Rubbing Alcohol
3oz. White Vinegar
1tsp. Laundry Detergent
1tsp. White Ammonia
2 drops Essential Oils (I used Lime, and love it!)
15oz. Water
 
I hope this post helps you make your own home cleaners.  Let me know what you think below!`


Wednesday, January 16, 2013

Homemade Cleaners: Bottles

For the longest time I've been wanting to make my own homemade cleaners.  I started by buying a bottle of Lysol concentrated formula and just mixing it with water, but that really wasn't what I wanted.  I liked the idea of having a more organic, and cheaper, way to clean my home.  I finally found recipes that I wanted to try and bought the ingredients.  Today I got the bottles ready... because, for some reason, the look of the bottles was important to me!

Step 1: Buy Bottles

I wanted cute bottles... don't ask my why. :)  So I went to Target and bought 6 of the Method daily shower cleaners, because that was one recipe that wasn't included in the recipe list I was using (I'll share that tomorrow when I make the cleaners).  Plus they were on sale!  It was perfect.  Those bottles are so cute.
When I got home, I emptied 5 of the 6 bottles into a gallon jug (I had to use a second container for the last little bit) and I will refill that cleaner from the jog until it runs out.  When it's empty, I'll try another recipe that I found through Pinterest for daily shower cleaner.

Step 2: Make Goo Gone

The next step was to take those lables off of the bottles.  I had this recipe for homemade Goo Gone from the blog No. 2 Pencil for a while, and I figured this was the perfect time to try it!  All it takes is 1 part vegetable oil and 2 parts baking soda.  The oil breaks down the labels, and the abbrasiveness of the baking soda (plus its texture) scrapes them off.  It worked like a charm!

I added a tiny bit of essential oil (Lime) to it because I just love the smell of Goo Gone!


Step 3: Scrape off Labels

I lathered that Goo Gone onto the bottles and wiped off the lables.  I noticed that rubbing from side-to-side on the bottles, rather than up-and-down worked wonders.  I also noticed that the faster you peel off the lables, the less gunk there will be to scrape off.


The Method bottles were nice because they only had lables on three sides, and they were pretty easy to peel off!  They just left sticky gunk if you peeled them slowly.


I used a table knife to scrape with, but you could also just use a paper towel or your fingers.  I also put the bottles on an old cookie sheet to protect my table.


So, there you have it!  My bottles are ready for their cleaners to be added!  I'll do that tomorrow, since nap time is over.  Get your bottles ready and join me tomorrow in making some awesome cleaners!!


Monday, January 7, 2013

It's About to Go Bad!

What should I do??  My food is about to go bad, and I don't want to waste it!

Well, here's what I've come up with... this is a constantly revised post (meaning I'm planning to come back and update every time I think of something else to add), so come on back to see what else you can use even if it's about to go bad in your fridge!

Cake
Carrots
Cheese
Yogurt

If you have any other ideas for me, feel free to comment!  If there aren't links, it's just because I haven't gotten to it yet, but I have ideas so check back soon!


Tuesday, December 18, 2012

Carrots About to go Bad?

Here are some ideas for those carrots in your fridge that are about to go bad!

  1. Make soup!  Even if all you have on hand is broth, you can chop up those carrots and boil them in some broth and freeze that for when you want some chicken/turkey/beef soup!  If you don't have broth on hand, just boil them in water and drain, then freeze.
  2. Cut into slices, serve with dinner tonight as a side and send in lunches tomorrow.

3. Carrot Cake!  If you have the other ingredients on hand, go for it!  Just make sure that gets eaten, or freeze part of it so you're not wasting it.  You could also give it away to a neighbor or family member, or to a babysitter as a thank you.
4. Boil them down, grind them up, and freeze them in drops for your baby/toddler/preschooler.